
AI filmmaking used to mean juggling five different tools - one for image generation, another for video, a separate editor, and so on. Melies puts the entire AI filmmaking pipeline in one place.
This guide walks you through creating an AI film from start to finish: concept, characters, storyboard, video production, editing, audio, and export.
Quick answer: AI filmmaking in Melies follows an 8-step pipeline: generate your concept with the Movie Idea Generator, cast AI actors for character consistency, produce storyboard images, convert them to video clips, edit on the timeline, add audio, and export. A 2-minute short film with 15-20 clips costs 1,000-3,000 credits depending on model choices.
The AI Filmmaking Pipeline at a Glance
- Concept - Generate your movie idea
- Characters - Cast AI actors for consistency
- Storyboard - Generate scene images
- Visual direction - Explore angles, lighting, and styles
- Video production - Animate your storyboard frames
- Editing - Arrange clips on the timeline
- Audio - Add music, voice, and sound effects
- Export - Render your finished film
Let's walk through each step.
Step 1: Generate Your Movie Idea
Start with the
. It helps you develop a complete concept by combining:- Story archetype - Choose from 10 proven structures (Monster in the House, Golden Fleece, Buddy Love, Fool Triumphant, and more)
- Tone - Dark & Gritty, Light & Fun, Suspenseful, Whimsical, Surreal, and others
- Time period - Ancient through Far Future, including Alternate History
- Location - Small Town, Big City, Space, Fantasy Realm, Underwater, and more
- Hero type - Reluctant Hero, Anti-Hero, Everyman, Chosen One, Outcast, and others
- Hero flaw - Hubris, Fear, Distrust, Addiction, Guilt, Obsession
- Antagonist - Human Villain, System/Institution, Nature, Inner Demon, Supernatural Entity
- Catalyst - Discovery, Betrayal, Loss, Mysterious Event
- Theme - Redemption, Sacrifice, Identity, Power, Freedom, Justice
The wizard generates a movie concept with a synopsis, character descriptions, and key plot points. Use this as your foundation - or start with your own idea.
Tip: Even if you already have a story in mind, running it through the Movie Idea Generator can surface interesting twists you had not considered.
Step 2: Cast Your Characters with AI Actors
Consistent characters are what separate a professional-looking AI film from a collection of random images. Open the
Casting Process
- Identify your main characters from the movie concept
- Browse the 148 AI actors - filter by gender, age group, and type (Actor, Influencer, Everyday)
- Select one actor per character - their appearance will stay consistent across all scenes
- Note which actor maps to which character so you can switch between them easily
Why This Matters
Without AI actors, your detective might be a 30-year-old in scene one and a 50-year-old in scene two. AI actors lock in the physical appearance so you can focus on directing the scene, not fighting for character consistency.
For a short film, you typically need 2-4 main characters. You can always add background characters through prompts without using dedicated actors.
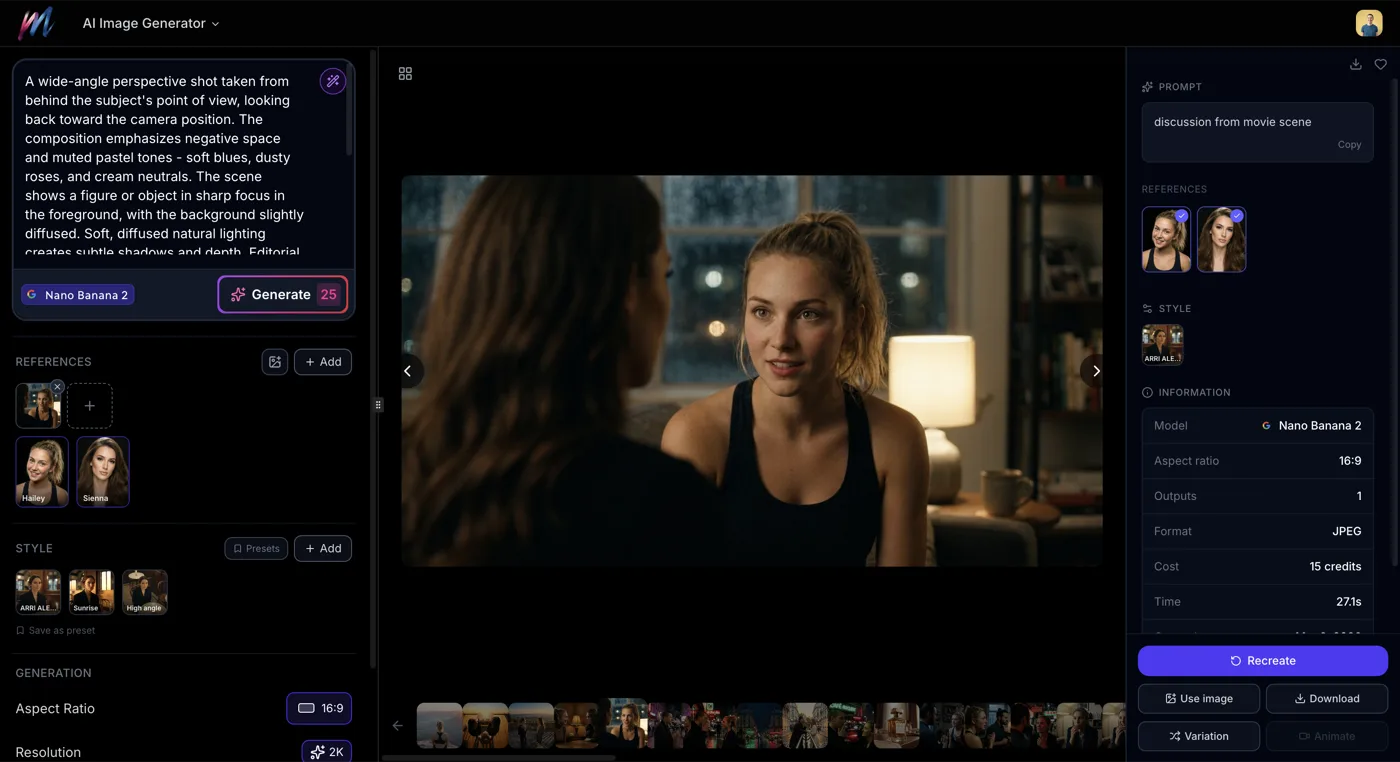
Step 3: Generate Your Storyboard
With your concept and cast ready, it is time to create the visual storyboard. Open the
and start generating scene images.Storyboard Workflow
For each scene in your film:
- Select the right AI actor for the scene's main character
- Write a scene prompt focusing on setting, action, and mood (the actor handles appearance)
- Start with a fast model - Flux Schnell (2 credits) to test the composition
- Upgrade the model - Once the prompt works, switch to Seedream 4.5 (10 credits) or Flux Pro (15 credits) for production quality
- Choose the right aspect ratio - 16:9 for standard film, 21:9 for cinematic widescreen
Scene Prompt Examples
Opening scene:
Standing at the edge of a fog-covered pier at dawn, looking out over calm water, distant city lights barely visible, melancholic atmosphere
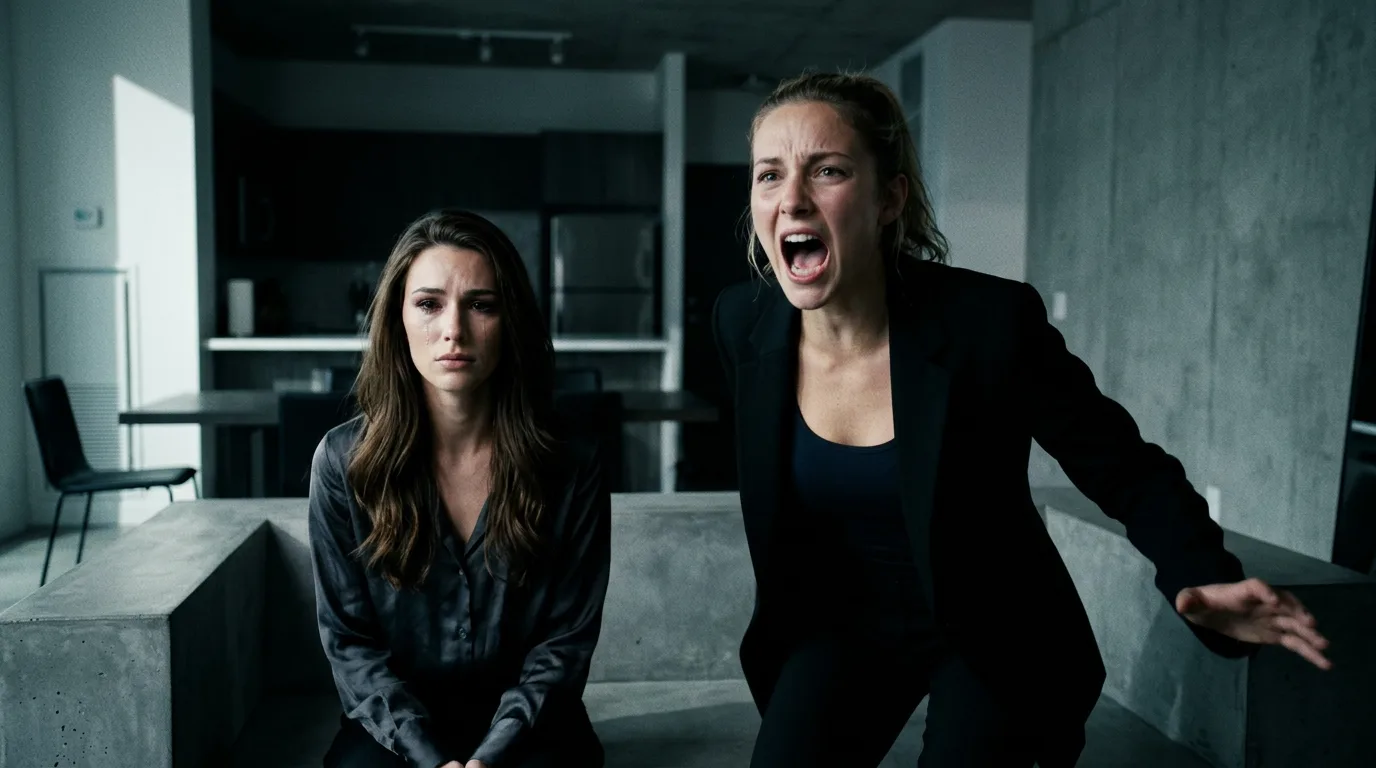
Confrontation scene:
Sitting across a table in an interrogation room, harsh overhead fluorescent lighting, tense atmosphere, leaning forward with intensity
Climax:
Running through a crowded market at night, neon signs overhead, rain falling, motion blur in the background, urgent energy
How Many Frames?
A 1-2 minute short film typically needs 10-20 shots. Generate at least one key frame per shot. For important scenes, generate multiple frames showing different moments within the scene.
Step 4: Direct the Visual Style
This is where your storyboard becomes cinematic. Use the
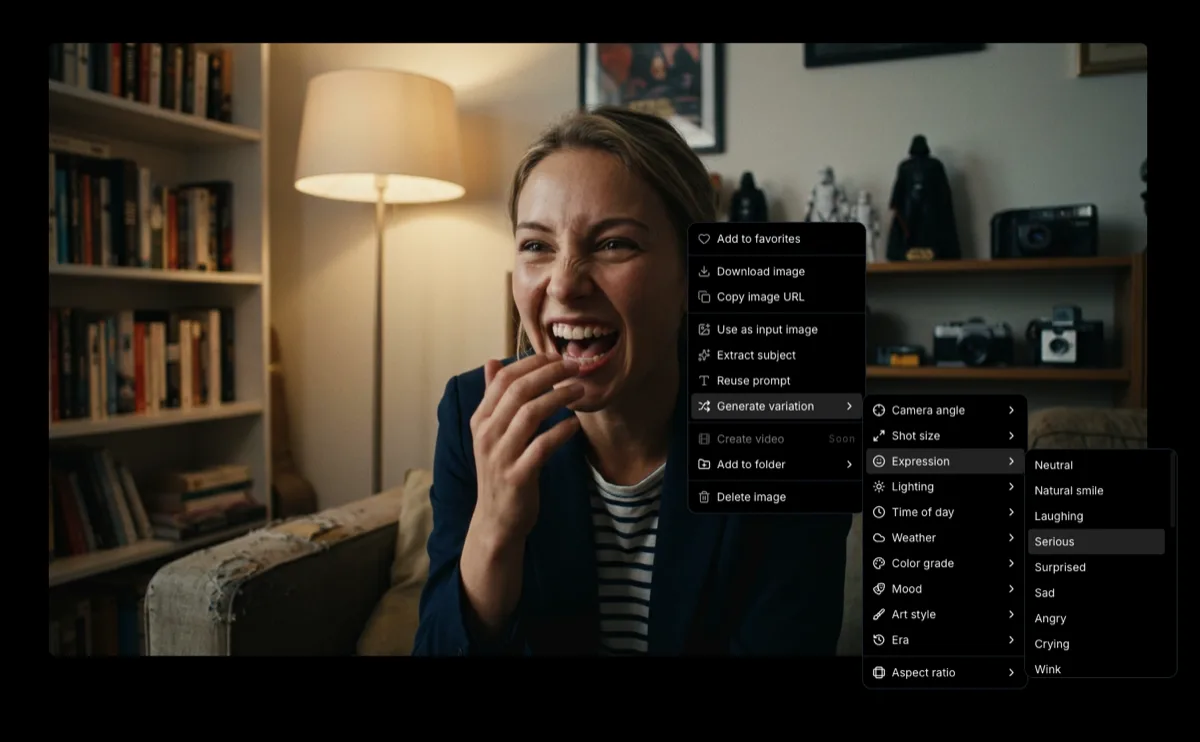
Establish Your Film's Look
Before diving into variations for individual scenes, decide on a consistent visual identity:
- Pick a color grade - Teal & Orange for blockbuster, Monochrome for noir, Filmic/Faded for indie. Use the same grade across all scenes.
- Choose an overall mood - This should match your film's tone (Tense/Thriller, Romantic, Epic/Heroic)
- Decide on an era if relevant - 1970s/New Hollywood, Near Future, Victorian/1880s
Per-Scene Visual Direction
For each scene, explore:
- Camera angles - Try Low Angle for power, Dutch Tilt for unease, Over-the-shoulder for dialogue
- Lighting - Match the scene's emotion (Golden Hour for warmth, Low-key Noir for tension)
- Expressions - Find the right performance (Cinema Pack has Villain Smirk, Thousand-yard Stare, Contemplative, and more)
- Weather - Add atmosphere where it serves the story (Rainy for mood, Foggy for mystery)
See the

Build a Shot List
As you finalize each storyboard frame, save it to your assets with a clear naming convention. You are building a shot list - the same way a real production does it.
Step 5: Generate Video Clips
Now turn your storyboard frames into video. Open the
and generate clips from your best images.Choosing Video Models
| Need | Recommended Model | Credits |
|---|---|---|
| Highest quality hero shot | Veo 3.1 | 400 |
| Best overall for most scenes | Kling v3 Pro | 100 |
| Longer dialogue scenes | Kling v3 Standard | 60 |
| Camera-specific movements | LTX 2 Pro | 50 |
| Quick test renders | LTX 2 Pro or WAN v2.2 | 50-60 |
Writing Motion Prompts
For each shot, describe the motion clearly:
Static shot with subtle movement:
Slight breeze moves hair, character breathes naturally, background leaves rustle gently
Character action:
Slowly stands up from the chair, turns to face the window, hands clenched at sides
Camera movement:
Camera slowly dollies in toward the character's face, shallow depth of field increases, background goes soft
Dynamic scene:
Running through the corridor, camera tracking from the side, coat flowing behind, fluorescent lights flickering overhead
Iteration Strategy
- First pass with LTX 2 Pro (50 credits) - Test the motion prompt cheaply
- Refine the prompt based on what worked
- Final render with Kling v3 Pro (100 credits) or Veo 3.1 (400 credits) for hero shots
Not every shot needs to be premium. Use cheaper models for quick cuts and background shots, save the expensive models for close-ups and key moments.
Step 6: Edit on the Timeline
With your video clips ready, bring them to the Melies timeline editor.
Assembling Your Edit
- Import your clips to the timeline
- Arrange in story order - Drag clips to their position in the narrative
- Trim clips - Cut the start or end of any clip to tighten the pacing
- Adjust timing - Control how long each shot stays on screen
Pacing and Rhythm
Good editing is about rhythm. Some guidelines:
- Establishing shots hold longer (3-5 seconds) - let the audience absorb the environment
- Dialogue and action cut faster (2-3 seconds per shot) - keep energy high
- Emotional moments hold on close-ups (3-4 seconds) - let the feeling land
- Transitions between scenes can use longer holds with mood shifts
Continuity
Check that each cut makes visual sense:
- Do the lighting conditions match between adjacent shots in the same scene?
- Is the character's position consistent from shot to shot?
- Does the color grade stay consistent throughout?
Using the same AI actor across scenes handles character continuity. Using the same color grade variation handles visual consistency. This is why the earlier steps matter.
Step 7: Add Audio
Audio is half the experience. The Melies timeline supports three audio layers:
Music
Set the emotional tone of your film. Choose a music track that matches the mood you established in your visual direction. Adjust volume to sit under dialogue and sound effects.
Voice
Add narration, dialogue, or voice-over. If your film has characters speaking, voice tracks bring them to life beyond the visuals.
Sound Effects
Ambient sound, footsteps, door slams, rain - sound effects sell the reality of your scenes. Even simple ambient noise makes an enormous difference.
Tip: Veo 3.1 generates native audio with the video. For clips made with other models, you will add audio in the timeline.
Volume Control
Each audio layer has independent volume control. A common mix:
- Music at 30-50% (background)
- Voice at 100% (foreground)
- Sound effects at 60-80% (supporting)
Step 8: Export Your Film
When your edit is locked, export from the timeline:
Export Settings
| Setting | Options | Recommendation |
|---|---|---|
| Format | MP4, WebM | MP4 for widest compatibility |
| Resolution | 480p, 720p, 1080p | 1080p for quality, 720p for smaller files |
| Quality | Low (CRF 28), Medium (CRF 23), High (CRF 18) | High for final distribution |
| FPS | 1-60 | 25 FPS (default) for cinematic feel |
| Aspect Ratio | 16:9, 3:2, 1:1, 2:3, 9:16 | 16:9 for standard film |
Export for Different Platforms
- YouTube: 16:9, 1080p, High quality, MP4
- TikTok / Instagram Reels: 9:16, 1080p, High quality, MP4
- Film festivals / portfolio: 16:9, 1080p, High quality, MP4
- Quick sharing: 16:9, 720p, Medium quality, MP4
You can also set a poster frame - the thumbnail image that represents your film before it plays.
Budget Planning
Here is a rough credit budget for different project sizes:
Micro Short (30 seconds, 5-8 shots)
- Storyboard images: 50-100 credits (fast models for iteration + quality finals)
- Video clips: 300-500 credits (budget models for most, premium for hero shots)
- Total: ~400-600 credits
Short Film (1-2 minutes, 15-20 shots)
- Storyboard images: 100-250 credits
- Variations and exploration: 100-200 credits
- Video clips: 800-2,000 credits
- Total: ~1,000-2,500 credits
Ambitious Short (3-5 minutes, 30-50 shots)
- Storyboard images: 200-500 credits
- Variations and exploration: 200-400 credits
- Video clips: 1,500-5,000 credits
- Total: ~2,000-6,000 credits
Cost-saving tip: Use Flux Schnell for all prompt testing, Seedream 4.5 for storyboard finals, and Kling v3 Standard for most video clips. Reserve Kling v3 Pro and Veo 3.1 for your most important shots.
Why AI Filmmaking Works Best in One Platform
The beauty of AI filmmaking in one platform is that each step feeds naturally into the next. Your movie concept informs your character casting. Your characters inform your storyboard. Your storyboard frames become your video source material. Your video clips flow into the timeline. Audio completes the experience. And export delivers your finished film.
No downloading, re-uploading, converting formats, or juggling subscriptions. Just create.
What to Do Next
- - Start with a concept
- - Create your storyboard
- - Bring frames to life
- Image generation guide- Master the basics
 How to Generate AI Images with MeliesLearn how to generate AI images step by step with Melies. Choose from 16 models, write effective prompts, pick the right aspect ratio, and create stunning visuals.
 - AI actors guide- Build consistent charactersAI Character Generator: Create Consistent AI CharactersUse the Melies AI character generator to create consistent characters across scenes. Browse 148 pre-built AI actors and generate images with the same character every time.
- Video generation guide- Detailed video walkthrough
 AI Image to Video: How to Turn Any Image into Video with AITurn any AI image into video with Melies. Step-by-step guide to AI image to video generation with 8 models, text-to-video, motion prompts, and cinematic results.
 - Image styles guide- Explore all visual presetsAI Image Styles: Camera Angles, Lighting, Color Grading & MoreExplore all 11 AI image style categories in Melies including camera angles, lighting presets, color grades, art styles, moods, and more for cinematic visual storytelling.
Check the
for credit packages that fit your project size.