Generating AI images is the foundation of every project in Melies. Whether you are creating concept art for a film, building a storyboard, or just exploring visual ideas, the
gives you access to 16 models from providers like Black Forest Labs, Google, ByteDance, and xAI.This guide walks you through the entire process, from choosing a model to saving your best results.
Quick answer: To generate AI images with Melies, choose from 16 models (like Flux Schnell at 2 credits or Nano Banana 2 at 15 credits), write a descriptive prompt, select an aspect ratio, and click Generate. Start with Flux Schnell for fast iteration, then switch to premium models for final images.
Step 1: Open the AI Image Generator

Head to the
in Melies. You will see the generation panel with a prompt input, model selector, and aspect ratio options.This is your starting point for every image you create.
Step 2: Choose Your Model
Melies offers 16 image models, each with different strengths. Here is a quick breakdown to help you pick the right one:
For Speed and Experimentation
- Flux Schnell (2 credits) - The fastest model. Great for rapid iteration when you are still figuring out your prompt.
- FLUX.2 klein (5 credits) - Fast with decent quality. A good step up from Schnell without slowing you down.
For Balanced Quality
- Flux Dev (10 credits) - Solid all-rounder for general image generation.
- Seedream 4.5 (10 credits) - High quality from ByteDance, works well with diverse subjects.
- Flux Pro (15 credits) - Reliable quality with standard aspect ratios.
- Grok Imagine (15 credits) - High quality from xAI with 13 supported aspect ratios.
- Nano Banana 2 (15 credits) - Google's best model with resolution options from 0.5K to 4K.
For Maximum Quality
- FLUX.2 max (25 credits) - The highest quality Flux model with custom resolution up to 14142px.
- Flux Kontext Max (25 credits) - Best for character consistency and text rendering in images.
- FLUX.2 pro (20 credits) - High quality with custom resolution support.
Tip: Start with a cheap, fast model like Flux Schnell to nail your prompt, then switch to a higher-quality model for the final version. This saves credits while still getting great results.
Step 3: Write Your Prompt
The prompt is where you describe what you want to see. The more specific and descriptive you are, the better your results will be.
Prompt rewrite assistant: The prompt field has a magic wand icon in the top right corner. Click it and Melies will rewrite your prompt automatically - adding detail, improving scene description, and making it more model-friendly. You can write something simple like "a detective in the rain" and the assistant will expand it into a rich, cinematic prompt. It is the fastest way to get great results without being an expert prompt writer.
Basic Prompt Structure
A good prompt typically includes:
- Subject - Who or what is in the image
- Setting - Where the scene takes place
- Lighting - How the scene is lit
- Mood/Style - The overall feel or artistic direction
Example Prompts
Simple:
A woman sitting in a cafe
Better:
A young woman sitting alone in a Parisian cafe, morning light streaming through large windows, warm golden tones, shallow depth of field, cinematic film still
Cinematic:
A detective standing under a flickering streetlight in a rain-soaked alley, 1940s film noir style, high contrast black and white, dramatic shadows, smoke curling from a cigarette
Prompt Tips
- Be descriptive - "Cinematic lighting" gives better results than just "good lighting"
- Mention the style - Add terms like "film still," "portrait photography," or "concept art" to guide the aesthetic
- Include technical details - Camera angle, lens type, and depth of field can dramatically change the output
- Use negative cues - Some models respond to phrases like "no blur" or "sharp focus"
- Keep it focused - Do not overload your prompt with contradicting styles. Pick a clear direction.
Step 4: Pick Your Aspect Ratio
Melies supports 9 aspect ratios. Choose the one that fits your intended use:
| Ratio | Name | Best For |
|---|---|---|
| Auto | Auto | Let the model decide |
| 21:9 | Cinematic | Widescreen film scenes |
| 16:9 | Landscape | Standard video frames, YouTube thumbnails |
| 4:3 | Classic | Traditional film look |
| 3:2 | Photo | Photography-style compositions |
| 1:1 | Square | Social media posts, album art |
| 2:3 | Photo Portrait | Vertical photography |
| 3:4 | Portrait | Character portraits |
| 9:16 | Portrait/Mobile | Instagram Stories, TikTok, mobile wallpapers |
For filmmakers: 21:9 gives you that cinematic widescreen look. 16:9 is the standard for most video projects. If you are creating storyboards, 16:9 is usually the safest choice.
Step 5: Generate Your Image
Click the Generate button. Depending on the model, your image will be ready in a few seconds (Flux Schnell) to about a minute (FLUX.2 max, Flux Kontext Max).
Once the image appears, you have several options:
- Generate again - Same prompt, different result. Every generation is unique.
- Generate variations - Right-click the image to explore different angles, lighting, moods, and styles. See our guide to image variationsfor details.
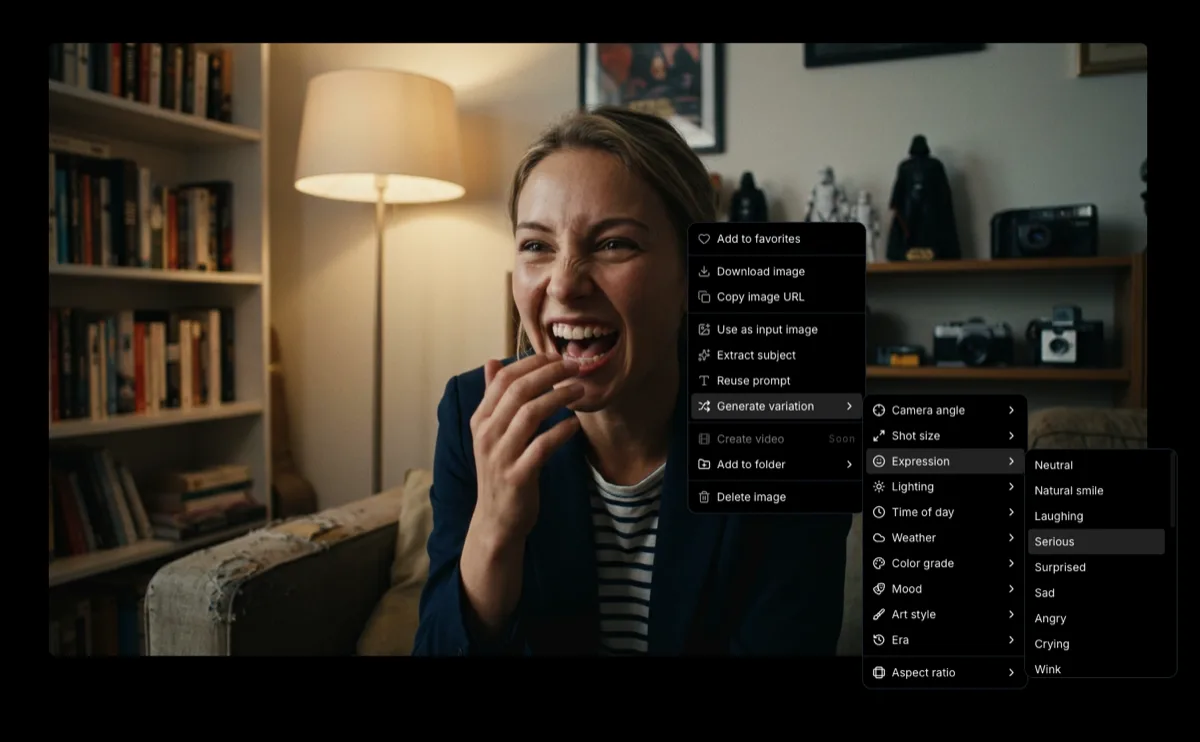 How to Generate AI Image VariationsLearn how to generate AI image variations in Melies. Change camera angles, lighting, expressions, color grades, and more from a single base image.
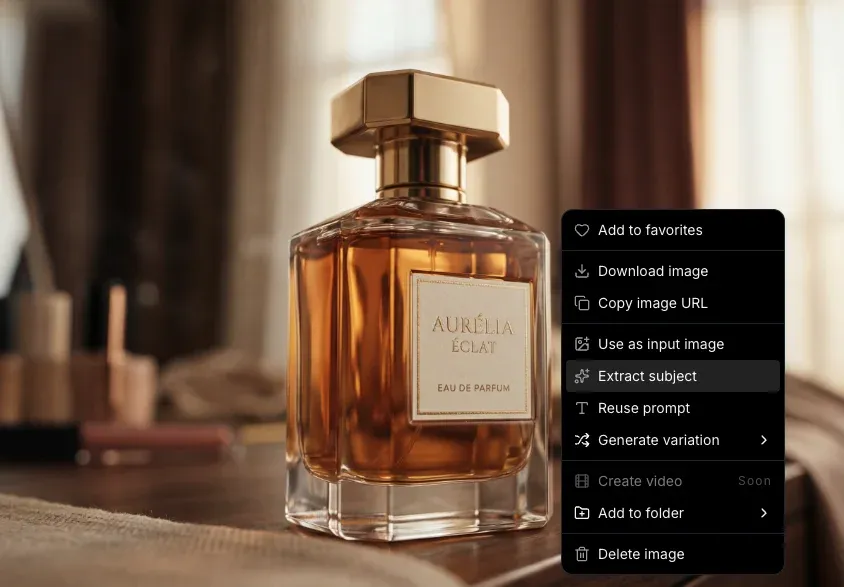
 - Extract subject - Isolate the main subject from the background for compositing. Learn more in our subject extraction guide.
 How to Extract a Subject from an AI ImageLearn how to extract and isolate subjects from AI-generated images in Melies. Remove backgrounds for compositing, character reuse, and creative workflows.
Step 6: Iterate and Refine
Rarely will your first generation be perfect. The best workflow is to iterate:
- Start cheap - Use Flux Schnell or FLUX.2 klein to test your prompt concept
- Refine the prompt - Adjust wording based on what worked and what did not
- Try different models - The same prompt can look very different across models
- Scale up - Once you have a prompt that works, switch to a higher-quality model for the final version
- Use variations - Generate variations to explore different camera angles, lighting conditions, and color grades
Step 7: Save to Your Assets
When you have an image you love, save it to your project assets. This lets you:
- Use it later in video generation (image-to-video)
- Reference it for consistent character looks across scenes
- Build a library of visual assets for your film project
Using Reference Images

Some models support reference images, which let you upload an existing image to guide the generation. This is especially useful when you want to:
- Match a specific visual style from a reference photo
- Generate new angles of an existing character
- Create variations that stay close to a specific look
Models like Flux Kontext and Flux Kontext Max are particularly good at maintaining consistency with reference images.
Using AI Actors for Consistent Characters

If you need the same character across multiple images, check out

Model Comparison at a Glance
For a full deep-dive into every image model, read our


| Model | Credits | Speed | Quality | Best For |
|---|---|---|---|---|
| Flux Schnell | 2 | Fastest | Basic | Quick tests |
| FLUX.2 klein | 5 | Fastest | Good | Fast iteration |
| Flux Dev | 10 | Medium | Good | General use |
| Seedream 4.5 | 10 | Medium | High | Diverse subjects |
| Nano Banana 2 | 15 | Fast | Best | High-res output |
| Grok Imagine | 15 | Medium | High | Wide format support |
| Flux Pro | 15 | Medium | High | Reliable quality |
| FLUX.2 pro | 20 | Medium | High | Custom resolution |
| Flux Kontext | 20 | Medium | High | Character consistency |
| FLUX.2 max | 25 | Slow | Best | Maximum quality |
| Flux Kontext Max | 25 | Slow | Best | Best consistency |
What to Do Next
Now that you can generate images, here are some natural next steps:
- Generate image variations- Explore different camera angles, lighting, and styles from a single imageHow to Generate AI Image VariationsLearn how to generate AI image variations in Melies. Change camera angles, lighting, expressions, color grades, and more from a single base image.
- Create AI actors- Build consistent characters for your film projectAI Character Generator: Create Consistent AI CharactersUse the Melies AI character generator to create consistent characters across scenes. Browse 148 pre-built AI actors and generate images with the same character every time.
- Generate AI videos- Turn your best images into video clips
 AI Image to Video: How to Turn Any Image into Video with AITurn any AI image into video with Melies. Step-by-step guide to AI image to video generation with 8 models, text-to-video, motion prompts, and cinematic results.
 - Create a full AI film- Learn the end-to-end filmmaking workflow in Melies
 AI Filmmaking: How to Create an AI Film from Idea to ExportLearn the complete AI filmmaking workflow with Melies. Generate ideas, cast AI actors, create storyboards, produce video clips, edit on a timeline, and export your finished AI film.
Check out our